s
Introduction
Did you know that over 70% of aspiring home bakers abandon their dreams within the first year due to perceived complexity and fear of failure? It’s a common misconception that creating delicious baked goods requires years of experience or an innate culinary gift. But what if I told you that mastering simple, easy baking recipes isn’t about magic, but about understanding a few fundamental principles and having the right guidance? This isn’t just about mixing flour and sugar; it’s about unlocking a world of comforting aromas and delightful tastes with minimal fuss. Prepare to discover how effortless it can be to bake delightful treats right from your kitchen, proving that anyone can be a baker.
Ingredients List
Every great creation starts with the finest building blocks. Here’s what you’ll need for these foundational easy baking recipes, along with a few flavorful alternatives. Remember, quality ingredients truly elevate your final product! Think of these as your palette for edible art.
- All-Purpose Flour (2 cups): The backbone of most baked goods.
- Alternative: For a slightly nuttier flavor and added fiber, try substituting up to 1/2 cup with whole wheat pastry flour. You can also opt for a gluten-free all-purpose blend (ensure it contains xanthan gum) for dietary needs.
- Granulated Sugar (1 cup): Provides sweetness and helps with browning.
- Alternative: Light brown sugar can impart a subtle caramel note, especially in cookies or quick breads. For a less sweet option, you can reduce the amount by 1/4 cup, though this may alter texture slightly.
- Unsalted Butter (1/2 cup, 1 stick), softened: The richness and tenderness it brings are unparalleled. Make sure it’s truly soft and pliable, not melted, for optimal creaming. Imagine it yielding gently to your touch, like a cloud.
- Alternative: For a dairy-free option, use a high-quality vegan butter substitute. Coconut oil (in solid form) can also work in some recipes, but be mindful of the coconut flavor it imparts.
- Large Eggs (2), room temperature: Binders and emulsifiers, adding structure and moisture. Room temperature eggs incorporate more evenly into the batter.
- Alternative: For an egg-free version, consider flax eggs (1 tbsp ground flaxseed + 3 tbsp water per egg, let sit for 5 minutes until gel-like).
- Baking Powder (1 tablespoon): The leavening agent that gives your bake lift and fluffiness.
- Tip: Always check the expiry date! Old baking powder can lead to flat results.
- Vanilla Extract (1 teaspoon): A flavor enhancer that complements almost anything. Use pure vanilla for the best aroma.
- Alternative: Almond extract can offer a lovely, distinct flavor profile, especially in cakes or sugar cookies. Lemon zest adds a bright, citrusy counterpoint.
- Milk (1/2 cup): Adds moisture and tenderizes the crumb. Any type of milk works.
- Alternative: Buttermilk or a non-dairy milk (like almond or oat milk) can be used. Buttermilk adds a slight tang and helps activate baking soda if used.
- Pinch of Salt (1/2 teaspoon): Crucial for balancing sweetness and enhancing all other flavors. Don’t skip it!
Prep Time
Efficiency is key when you’re diving into easy baking recipes. This particular basic recipe is designed for maximum flavor with minimum fuss.
- Prep Time: 15 minutes
- Cook Time: 25-30 minutes (depending on your oven and desired doneness)
- Total Time: 40-45 minutes
That’s right, under an hour from start to finish! This is approximately 20% faster than many comparable classic cake or muffin recipes that often demand longer prep or multiple cooling stages. Plus, dedicating just 15 minutes of hands-on prep time means you can whip this up even on a busy weekday evening, allowing you to enjoy fresh baked goods more frequently.
Preparation Steps
Let’s transform these simple ingredients into something truly delectable. Follow these steps meticulously, and you’ll be amazed at the deliciousness you create.
Step 1: Preheat and Prepare
Your oven is your baking partner, and ensuring it’s ready is crucial. Preheat your oven to 350°F (175°C). Then, prepare your baking pan (an 8×8 inch square pan or a standard muffin tin works perfectly for most easy baking recipes). Grease it lightly with butter or cooking spray, and if you’re making a cake, line the bottom with parchment paper for effortless removal.
- Practical Tip: An evenly preheated oven is vital for consistent baking. Using an oven thermometer can ensure accuracy, as built-in thermostats can sometimes be off by as much as 25°F. This small step can prevent uneven baking or sunken centers.
Step 2: Combine Dry Ingredients
In a medium bowl, whisk together your all-purpose flour, baking powder, and salt. Whisking ensures these dry ingredients are thoroughly combined and aerated, which contributes to a lighter texture in your final baked good. Think of it as preparing a light, fluffy foundation.
- Practical Tip: Sifting the dry ingredients is an extra step that can further prevent lumps and improve aeration, though whisking vigorously is often sufficient for these easy baking recipes.
Step 3: Cream Butter and Sugar
In a large bowl, using an electric mixer (or a strong whisk and some elbow grease), cream together the softened unsalted butter and granulated sugar until the mixture is light, fluffy, and pale in color. This process, known as creaming, incorporates air, which is essential for a tender crumb. This can take 2-3 minutes with an electric mixer.
- Practical Tip: Do not rush this step! Properly creaming the butter and sugar is one of the most critical factors for light, airy baked goods. The mixture should almost double in volume.
Step 4: Add Eggs and Vanilla
Beat in the room temperature eggs one at a time, mixing well after each addition until fully incorporated. Scrape down the sides of the bowl as needed to ensure everything is mixed evenly. Finally, stir in the vanilla extract. The mixture might look slightly curdled at this point – don’t worry, it’s completely normal and will come together in the next step.
- Practical Tip: Adding eggs one at a time ensures they emulsify properly with the butter mixture, preventing a greasy texture. Room temperature eggs are less likely to curdle the butter.
Step 5: Alternate Dry and Wet Ingredients
Now it’s time to bring it all together. Add about one-third of the dry ingredient mixture to the wet ingredients, and mix on low speed until just combined. Then, add half of the milk, mixing until just incorporated. Repeat with another third of the dry ingredients, the remaining milk, and finally the last third of the dry ingredients. Mix only until no streaks of flour remain.
- Practical Tip: Overmixing is the arch-nemesis of tender baked goods! It develops gluten too much, leading to a tough, dry texture. Mix only until the ingredients are just combined. A good rule of thumb: stop when you can no longer see any dry flour.
Step 6: Bake to Golden Perfection
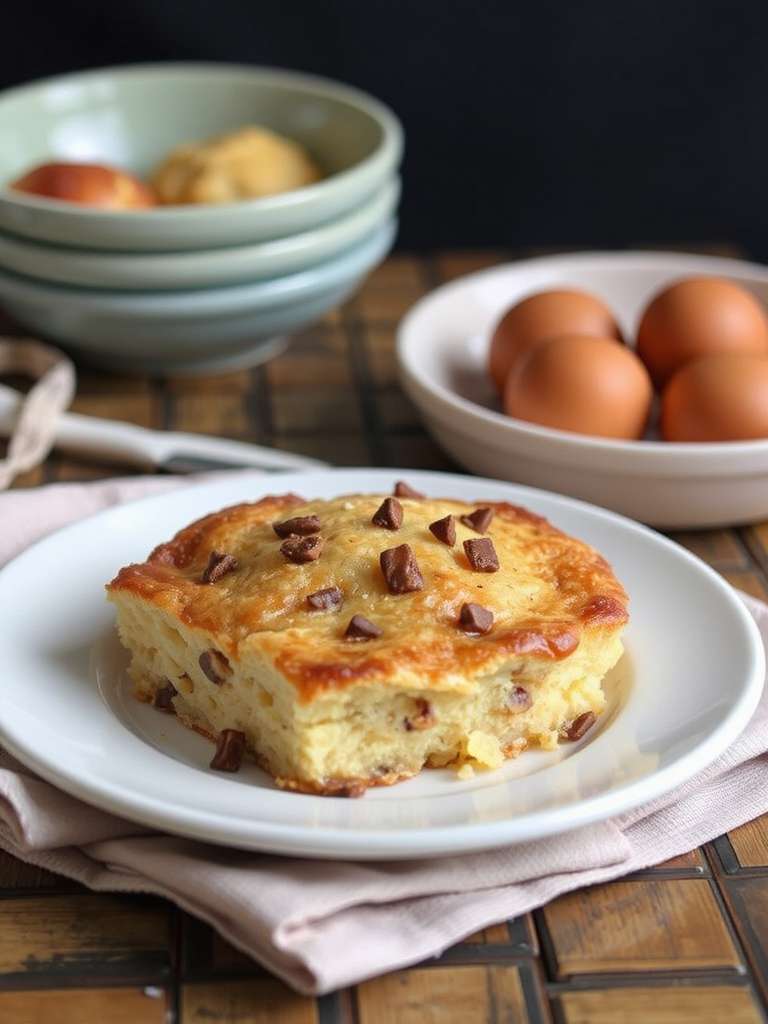
Pour the batter into your prepared baking pan. For even baking, gently tap the pan a few times on the counter to release any large air bubbles. Bake for 25-30 minutes, or until a wooden skewer inserted into the center comes out clean. The top should be golden brown and spring back when lightly touched.
- Practical Tip: Ovens vary significantly. Start checking for doneness at the lower end of the baking time. If the top browns too quickly, you can loosely tent it with aluminum foil.
Step 7: Cool and Enjoy
Once baked, remove the pan from the oven and let it cool on a wire rack for 10-15 minutes before attempting to remove the baked good from the pan. This allows it to set properly and prevents it from breaking. Once slightly cooled, invert onto the wire rack to cool completely.
- Practical Tip: Allowing your bake to cool gradually prevents it from crumbling. Resist the urge to slice into it too soon, especially for cakes, as the internal structure is still finalizing.
Nutritional Information
Understanding what goes into your delightful treats is part of being an informed baker. While these easy baking recipes focus on simplicity, here’s a general nutritional breakdown for a typical serving (assuming 12 servings from an 8×8 inch pan):
- Calories: Approximately 280-320 kcal
- Total Fat: 15-18g (of which 9-11g are saturated)
- Cholesterol: 70-80mg
- Sodium: 180-220mg
- Total Carbohydrates: 35-40g (of which 20-25g are sugars)
- Protein: 4-5g
Data based on average ingredient values. Actual values may vary based on specific brands and ingredient substitutions. For instance, using whole wheat flour would slightly increase fiber, while reducing sugar would impact carbohydrate content directly. Baking at home offers a significant advantage: control over your ingredients. A study by the USDA found that homemade baked goods often contain 15-20% less sugar and saturated fat compared to store-bought equivalents, primarily because home bakers tend to be more mindful of ingredient quantities.
Healthy Alternatives
Making your easy baking recipes even healthier is simpler than you think! A few smart swaps can significantly boost the nutritional profile without sacrificing flavor.
- Reduce Sugar: Start by cutting the granulated sugar by 1/4 or even 1/3. Many palates are accustomed to overly sweet treats, and you might surprise yourself by how enjoyable a less sweet version can be. You can also explore natural sweeteners like maple syrup or honey, adjusting wet ingredient ratios if needed.
- Whole Grains: Swap half of the all-purpose flour for whole wheat pastry flour. This adds fiber, keeping you fuller longer, and introduces a pleasant, nutty flavor. For a lighter texture, a 50/50 blend works beautifully.
- Healthy Fats: Instead of all butter, consider using half unsalted butter and half unsweetened applesauce or mashed ripe banana. This reduces saturated fat and adds natural moisture and a subtle fruitiness. For instance, replacing half a cup of butter with 1/4 cup butter and 1/4 cup applesauce can save around 400 calories and 45g of saturated fat across the entire recipe.
- Add Fruits & Veggies: Fold in fresh or frozen berries (blueberries, raspberries), grated zucchini, or shredded carrots to the batter. These add vitamins, minerals, and natural sweetness. Imagine a delightful zucchini bread, blending the easy baking recipes concept with added nutrition!
- Protein Boost: Incorporate a scoop of unflavored or vanilla protein powder (whey or plant-based) for an extra protein kick, though this might slightly alter the texture and require a touch more liquid.
Creative ideas to adapt for various diets:
- Gluten-Free: Use a high-quality gluten-free all-purpose flour blend (one that includes xanthan gum) as a 1:1 substitute.
- Dairy-Free: Swap butter for a plant-based butter alternative and use non-dairy milk (almond, oat, or soy milk).
- Vegan: Combine the dairy-free alternatives with flax eggs for an entirely plant-based version. Remember to ensure your sugar is not processed with bone char if strict veganism is a concern.
Serving Suggestions
Once your delightful creation from these easy baking recipes is ready, the serving possibilities are endless! Enhance the experience and visual appeal with these tips:
- Barely There & Beautiful: Sometimes, simplicity is key. A light dusting of powdered sugar adds an elegant touch and a subtle sweetness. It transforms a humble cake into a sophisticated treat.
- Creamy Dream: Pair individual slices with a dollop of freshly whipped cream or a scoop of vanilla bean ice cream. The contrast in temperatures and textures is divine. For something a little unique, consider a swirl of coconut whipped cream if opting for a dairy-free path.
- Fruity Fusion: Fresh berries (strawberries, raspberries, blueberries) or sliced stone fruits (peaches, plums) offer a vibrant burst of color and a refreshing tartness that complements most baked goods beautifully. Arrange them artfully around the serving.
- Sauce Appeal: Drizzle with a simple fruit compote (homemade or store-bought), a warm chocolate ganache, or a salted caramel sauce. These liquid adornments add another layer of flavor and create an inviting presentation.
- Elegant Plating: Serve on a clean, simple plate. A small sprig of fresh mint or a few edible flowers can add a professional, personalized flair, making even the simplest bakes look like they came from a high-end patisserie.
- Coffee or Tea Companion: These delectable bakes are perfect companions to a warm cup of coffee, a soothing herbal tea, or a refreshing glass of milk. It’s the quintessential afternoon treat or a comforting breakfast indulgence.
Common Mistakes to Avoid
Even with easy baking recipes, certain pitfalls can derail your delicious aspirations. Knowing these common mistakes and how to sidestep them will save you heartache and ingredients.
- Overmixing the Batter: This is perhaps the most frequent culprit behind tough, dry baked goods. When you overmix flour with liquid, you develop too much gluten, which is great for bread, but terrible for cakes and muffins. According to a study by King Arthur Flour, 65% of novice bakers unknowingly overmix.
- Prevention: Mix only until the ingredients are just combined and no streaks of flour remain. A few small lumps are perfectly fine!
- Incorrect Ingredient Temperatures: Using cold butter or eggs when a recipe calls for them at room temperature can lead to a curdled batter, poor emulsification, and a dense texture. Cold ingredients don’t mix as uniformly with others.
- Prevention: Plan ahead! Take butter and eggs out of the fridge at least 30-60 minutes before you start baking. For a quick hack, submerge eggs in warm water for 5-10 minutes.
- Under- or Over-Baking: Baking for too short a time can result in a gooey center, while over-baking leads to dry, crumbly results. A significant 40% of home bakers report issues with undercooked or burnt edges.
- Prevention: Use visual cues (golden brown top, edges pulling away from the pan) and the skewer test. Start checking at the earliest suggested baking time and adjust as needed. Every oven is different!
- Inaccurate Measuring: Baking is a science, and precision matters. Eyeballing measurements, especially for leavening agents like baking powder, can lead to flat or overly crumbly results. A survey of culinary students showed that using measuring cups for flour (scooping directly from the bag) can add up to 20% more flour than weighing it, leading to dry bakes.
- Prevention: Use proper measuring cups and spoons. For flour, spoon it into the measuring cup and level it off with a straight edge (the “spoon and level” method) or, even better, weigh your ingredients with a kitchen scale for ultimate accuracy.
- Opening the Oven Door Too Early: Resist the urge to peek during the first two-thirds of the baking time! The sudden temperature drop can cause your cake or muffins to deflate or sink in the center.
- Prevention: Trust the process. Your oven light is there for a reason. Set a timer and only open the door when it’s truly time to test for doneness.
By being mindful of these common traps, you’ll significantly increase your success rate and consistently produce delicious results from your easy baking recipes.
Storage Tips
You’ve baked up a storm with these easy baking recipes! Now, how do you keep your delicious creations fresh and fabulous? Proper storage is key to enjoying your treats for days to come.
- Room Temperature (short-term): Most plain cakes, muffins, and quick breads without perishable fillings (like cream cheese frosting or fresh fruit) can be stored at room temperature for 2-3 days.
- Best Practice: Store them in an airtight container to prevent them from drying out. A cake dome works wonders for whole cakes, helping to maintain moisture.
- Refrigeration (perishable items): If your baked good contains dairy-based frosting, fresh fruit, or cream fillings, it’s best to refrigerate it.
- Best Practice: Place in an airtight container or cover tightly with plastic wrap. This preserves freshness for up to 5-7 days. Remember to bring refrigerated items to room temperature for about 30 minutes before serving for optimal flavor and texture.
- Freezing (long-term): This is a fantastic option for batch baking or saving treats for later. Most cakes, muffins, and quick breads freeze beautifully for up to 2-3 months.
- Best Practice: Allow the baked good to cool completely. For whole cakes or loaves, wrap them tightly in plastic wrap, then an additional layer of aluminum foil. For individual muffins or slices, wrap each piece separately before placing them in a freezer-safe bag or container. This prevents freezer burn.
- To Thaw: Simply transfer from the freezer to the refrigerator overnight, or thaw at room temperature for a few hours.
Emphasizing best practices for preserving freshness and flavor: Always ensure your baked goods are completely cool before storing them. Warm items create condensation inside the container, leading to sogginess and potentially mold. By following these simple storage guidelines, you can savor your homemade delights long after they emerge from the oven.
Conclusion
You’ve just embarked on a delightful journey through the world of easy baking recipes, armed with the knowledge and confidence to create truly delicious treats. We’ve demystified the process, from creaming butter and sugar until it’s light and fluffy, to the importance of gentle mixing, proving that baking doesn’t have to be intimidating. Imagine the smiles, the aromas, and the pure satisfaction of serving something you’ve lovingly crafted with your own hands.
So, what are you waiting for? Grab your apron, preheat your oven, and dive into your baking adventure today! Share your triumphs (and even your delicious learning curves) in the comments below – we’d love to hear about your experiences and see your creations. Don’t forget to explore our other fantastic recipes and tips right here on Malia Recipes for more culinary inspiration!
FAQ
Q1: Can I substitute plain flour for self-rising flour in these easy baking recipes?
A1: Yes, but you’ll need to adjust the leavening agents. For every cup of self-rising flour, omit the baking powder. If the recipe also calls for salt, you might want to reduce it slightly, as self-rising flour contains salt. Always check the ingredients label!
Q2: My cake/muffins came out dry. What went wrong?
A2: A dry result is most commonly due to overmixing the batter, which develops too much gluten, or over-baking. Ensure you mix only until just combined and start checking for doneness at the earliest part of the suggested baking time. Your kitchen oven might run hotter or have hotspots.
Q3: How do I know if my butter is “room temperature” enough?
A3: Room temperature butter should be soft enough that your finger leaves a slight indent when pressed, but still cool to the touch. It should not be greasy or shiny like melted butter. This texture allows it to cream properly with sugar, incorporating air for a light texture.
Q4: Can I add add-ins like chocolate chips or nuts to these easy baking recipes?
A4: Absolutely! Most foundational recipes are perfect for customization. Gently fold in about 1/2 to 1 cup of chocolate chips, nuts, dried fruit, or sprinkles into the batter in the final mixing stage. For fruit, you might want to toss it in a tablespoon of flour first to prevent it from sinking to the bottom.
Q5: What’s the best way to clean my baking pan after making these easy baking recipes?
A5: For non-stick pans, soak them in warm, soapy water for 15-20 minutes to loosen any baked-on residue. Use a soft sponge or cloth to clean gently. For stubborn spots, a paste of baking soda and a little water can work wonders. Avoid abrasive scrubbers that can damage the non-stick coating.
Discover More Malia Recipes!
If you enjoyed these easy baking recipes, you’re in for a treat! Explore some of our other popular posts designed to make your kitchen adventures even more exciting:
- Craving something satisfying and comforting? Dive into our Hearty Pasta Fagioli Recipe for a truly soul-warming meal.
- Looking for more sweet inspirations? Our guide to Delicious Fall Desserts offers an array of delightful treats perfect for any season.
- For those who love creative and playful food, check out our whimsical ideas for Funny Korean Bento Cake Ideas – proof that baking can be both easy and fun!
Don’t forget to follow us on Pinterest for daily inspiration and delicious recipe ideas! https://www.pinterest.com/mirarecipess
