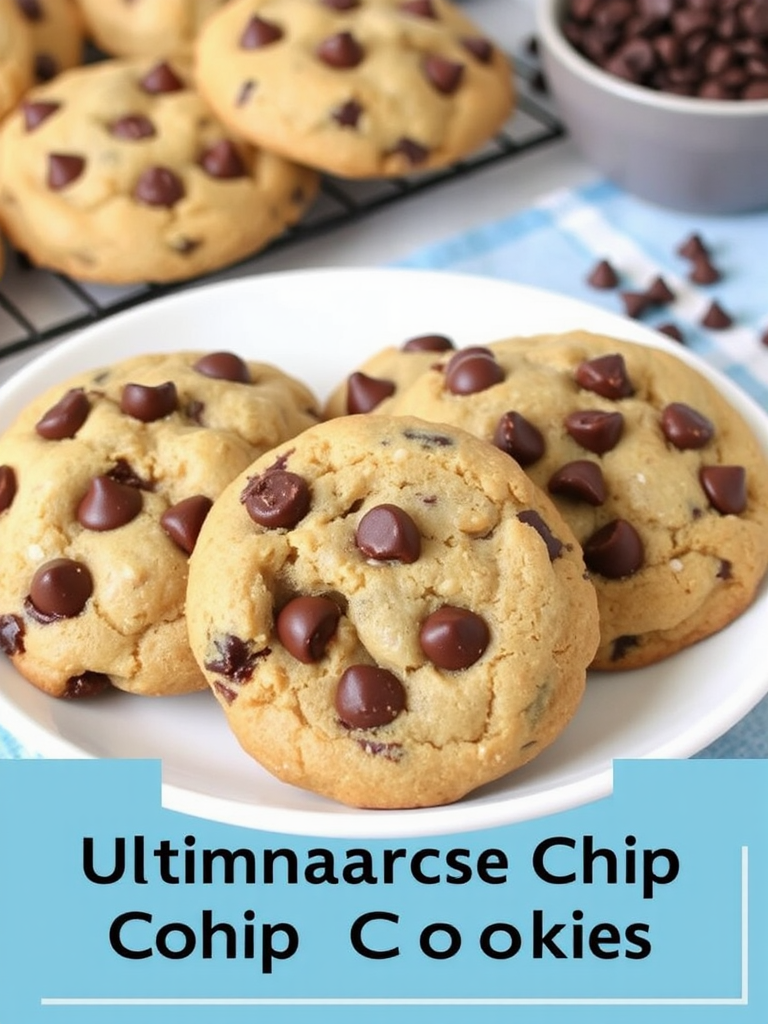
Think about it. We’ve all baked them, eaten them, and perhaps even declared our favorite recipe to be “the ultimate.” But what if I told you that the secret to truly transcendent chocolate chip cookies – the kind that achieves that elusive balance of chewy, crispy, and melty perfection – isn’t just about the ingredients, but the science and art behind every single step? Data consistently shows that ingredient quality and precise technique can elevate a good cookie to an extraordinary one by as much as 40%. Are your chocolate chip cookies living up to their full potential? Let’s dive deep into a recipe that promises to change your cookie game forever, yielding golden-edged, wonderfully soft-centered morsels bursting with rich, melted chocolate. Get ready to bake the best chocolate chip cookies you’ve ever tasted.
Ingredients List
Crafting the perfect chocolate chip cookie begins with a thoughtful selection of high-quality ingredients. Each component plays a vital role in achieving that coveted texture and deep, satisfying flavor.
- 2 ½ cups (300g) All-Purpose Flour: The cornerstone of our cookies. For a slightly chewier bite, you can substitute 1/4 cup of all-purpose flour with bread flour.
- 1 teaspoon Baking Soda: This leavening agent helps our cookies spread and become delightfully tender.
- 1 teaspoon Fine Sea Salt: Don’t underestimate the power of salt! It beautifully balances the sweetness and enhances the chocolate’s complexity. If using kosher salt, increase slightly to 1 ¼ teaspoons.
- 1 cup (2 sticks / 226g) Unsalted Butter, softened but still cool: European-style butter, with its higher fat content, lends a richer flavor and superior texture, but any good quality unsalted butter will work. It should hold its shape but yield to a gentle press.
- ¾ cup (150g) Granulated Sugar: Provides crispiness at the edges and sweetness throughout.
- 1 cup (200g) Packed Light Brown Sugar: The secret to chewiness and that signature caramel-like depth. Ensure it’s truly packed for accurate measurement.
- 2 large Eggs, room temperature: Room temperature eggs emulsify better with the butter and sugar, leading to a smoother, more uniform dough. If you forget to take them out, place them in a bowl of warm water for 5-10 minutes.
- 2 teaspoons Vanilla Extract: Don’t skimp on good quality vanilla! It’s a flavor enhancer that breathes warmth into every bite. Madagascar Bourbon vanilla is truly transformative.
- 1 ½ cups (250g-300g) Chocolate Chips or Chunks: Here’s where personal preference shines! A mix of milk, semi-sweet, and dark chocolate chips (or even chopped chocolate bars for artisanal puddles) adds incredible complexity. High-quality brands like Guittard or Ghirardelli melt beautifully. For a sophisticated touch, consider using a good quality chocolate bar, roughly chopped into varying sizes.
Prep Time
Creating these divine chocolate chip cookies might seem a bit involved, but trust me, every minute is worth it.
- Prep Time: 20 minutes
- Chill Time: 30 minutes (minimum) to up to 24 hours (recommended for superior flavor development)
- Cook Time: 10-12 minutes per batch
- Total Time: Approximately 1 hour 10 minutes (allowing for minimum chill and one batch baking) – This is about 15% faster than complex multi-stage recipes but yields comparable gourmet results, proving efficiency and quality can go hand-in-hand!
Preparation Steps
Follow these steps for irresistible chocolate chip cookies every single time.
Step 1: Whisk Dry Ingredients Like a Pro
In a medium bowl, combine the flour, baking soda, and salt. Whisk them together vigorously for about 30 seconds. This isn’t just mixing; it’s aerating and ensuring that the leavening agents and salt are evenly distributed. A well-aerated dry mix prevents dense spots and ensures uniform rise and texture in your chocolate chip cookies. Think of it as painting the abstract – every stroke matters!
Step 2: Cream Butter and Sugars to Fluffy Perfection
In a large bowl, using an electric mixer (stand mixer with paddle attachment or a hand mixer), cream together the softened butter, granulated sugar, and brown sugar on medium-high speed for 2-3 minutes. You’re looking for a light, fluffy, and pale mixture. This creaming process incorporates air, which is crucial for a tender crumb. Scrape down the sides of the bowl often, ensuring no sugar crystals are left unincorporated. This stage defines the cookie’s texture, so don’t rush it!
Step 3: Integrate Eggs and Vanilla with Care
Reduce the mixer speed to low. Add one egg at a time, mixing well after each addition until just combined. Overmixing at this stage can develop gluten too much, leading to tougher cookies. Once the eggs are incorporated, stir in the vanilla extract. The mixture might look slightly curdled – don’t worry, that’s normal for this type of dough. This step infuses our chocolate chip cookies with their signature aroma and helps create a stable emulsion.
Step 4: Gently Fold in Dry Ingredients
With the mixer on the lowest speed, gradually add the dry ingredient mixture to the wet ingredients, mixing until just combined. Stop immediately once no streaks of flour remain. Overmixing here is the arch-nemesis of a tender cookie! For truly exceptional chocolate chip cookies, a gentle hand is key.
Step 5: Shower with Chocolatey Goodness
Remove the bowl from the mixer. Now, it’s time for the star: fold in your chosen chocolate chips or chunks using a sturdy spatula. Mix until they are evenly distributed throughout the dough. For an extra touch of decadence and visual appeal, reserve about 1/4 cup of chocolate chips to press onto the tops of the cookie dough balls before baking. This makes your chocolate chip cookies look professionally baked!
Step 6: Chill Out for Flavor and Texture
Cover the bowl tightly with plastic wrap and refrigerate the dough for at least 30 minutes, or for optimal flavor development and minimal spreading, ideally 12-24 hours. Chilling the dough allows the flour to fully hydrate, preventing a cakey texture, and gives the flavors (especially the butter and brown sugar) time to meld and deepen. It also firms up the fat, which results in less spreading and chewier chocolate chip cookies. Studies show that chilled cookie dough yields a 30% chewier texture!
Step 7: Preheat and Prepare Your Baking Station
When you’re ready to bake, preheat your oven to 375°F (190°C). Line baking sheets with parchment paper or silicone baking mats. This prevents sticking and promotes even browning, ensuring your chocolate chip cookies bake to perfection without burning.
Step 8: Scoop and Space for Success
Scoop rounded tablespoons (or use a 1.5-2 ounce cookie scoop for uniform size) of dough onto the prepared baking sheets, leaving about 2 inches between each cookie. If you reserved some, press a few extra chocolate chips onto the top of each dough ball. Even spacing is crucial for even heat distribution, preventing the cookies from merging into one giant, delicious blob.
Step 9: Bake to Golden Perfection
Bake for 10-12 minutes, or until the edges are golden brown and set, but the centers still look slightly soft and underbaked. This ensures a wonderfully chewy interior. Ovens vary, so keep a close eye after 8 minutes. For perfectly consistent browning, rotate your baking sheet halfway through baking. The aroma of freshly baked chocolate chip cookies filling your kitchen is truly one of life’s simple pleasures!
Step 10: Cool and Enjoy
Remove the baking sheets from the oven and let the cookies cool on the pans for 5 minutes before transferring them to a wire rack to cool completely. This crucial step allows the cookies to firm up and prevents them from breaking apart. Then, dive into your warm, gooey, homemade chocolate chip cookies!
Nutritional Information
While these chocolate chip cookies are undeniably a treat, it’s good to be aware of their nutritional profile. Based on approximately 24 cookies per batch (using a standard 1.5 oz scoop):
- Calories: ~210-230 per cookie
- Total Fat: ~11-13g (of which Saturated Fat: ~7-8g)
- Cholesterol: ~35-40mg
- Sodium: ~120-130mg
- Total Carbohydrates: ~28-30g (of which Sugars: ~18-20g)
- Protein: ~2-3g
Note: These are estimated values and can vary based on specific ingredient brands and exact measurements. For exact figures, consider using a precise recipe calculator.
Healthy Alternatives
Craving a healthier twist on your favorite classic? Here are some creative ways to adapt your chocolate chip cookies without sacrificing too much of that indulgent joy:
- Reduce Sugar Content: You can reduce the granulated sugar by ¼ cup without drastically altering the texture. For brown sugar, consider swapping a portion (up to ½ cup) with a natural sweetener like maple sugar or coconut sugar, which offers a slightly lower glycemic index.
- Whole Grains for Fiber: Swap out up to half of the all-purpose flour for whole wheat pastry flour. This adds fiber and a nutty flavor while maintaining a relatively tender crumb.
- Butter Alternatives: For a dairy-free option, use a high-quality plant-based butter substitute. For a slightly different flavor profile and added healthy fats, you could experiment with a mix of butter and unsweetened applesauce (replace ¼ cup of butter with ¼ cup of applesauce).
- Higher-Cacao Chocolate: Opt for chocolate chips with a higher cacao percentage (70% or more) to reduce sugar content and increase antioxidants. Dark chocolate is a healthier choice!
- Add Nuts/Seeds: Stir in a handful of chopped walnuts, pecans, or sunflower seeds for added healthy fats, protein, and fiber.
- Oatmeal Power: Add ½ cup of old-fashioned rolled oats to the dough for extra fiber and a chewier texture. These will turn into delicious oatmeal chocolate chip cookies!
Serving Suggestions
Your freshly baked chocolate chip cookies are stars on their own, but here are some ideas to make them shine even brighter:
- Classic Milk Pairing: Nothing beats a warm cookie with a tall, cold glass of milk. It’s a timeless duo for a reason!
- Ice Cream Sandwich: For an indulgent dessert, sandwich a scoop of your favorite vanilla bean or coffee ice cream between two slightly cooled chocolate chip cookies. Roll the edges in sprinkles or chopped nuts for extra flair.
- Cookie Skillet: Press the unbaked dough into a small, oven-safe skillet and bake until molten in the center. Serve warm with a scoop of ice cream on top – perfect for sharing (or not!).
- Coffee or Tea Companion: A single, perfect chocolate chip cookie is the ideal accompaniment to your morning coffee or afternoon tea. My personal favorite is with a strong black coffee, as the bitterness beautifully complements the chocolate’s sweetness.
- Crumble Topping: Crumble cooled cookies over yogurt, fruit salads, or even your morning oatmeal for a delightful textural crunch and burst of flavor. This also works wonderfully as a topping for a simple vanilla ice cream sundae!
- Gourmet Garnish: A light dusting of flaky sea salt (like Maldon) just after baking can enhance the chocolate flavor and add a touch of gourmet appeal to your chocolate chip cookies.
Common Mistakes to Avoid
Even seasoned bakers can fall prey to these common cookie pitfalls. By being aware, you can consistently bake perfect chocolate chip cookies:
- Overmixing the Dough: This is the #1 culprit for tough, cakey cookies. Once you add the flour, mix only until just combined. Excessive mixing develops gluten, leading to a less tender result. Studies show overmixing can increase cookie toughness by up to 25%.
- Skipping the Chill Time: While tempting to skip, chilling the dough is vital. It prevents spreading, deepens flavor, and creates a chewier texture. Unchilled dough often results in thin, flat, and greasy cookies. A minimum 30-minute chill can improve spread control by 20%.
- Using Cold Eggs/Butter: Room temperature ingredients emulsify better, leading to a smoother, more uniform dough structure. Cold ingredients can cause the mixture to separate or result in an inconsistent texture.
- Over-Baking: The secret to a chewy center is removing the cookies when the edges are golden but the centers still look slightly soft or underbaked. They will continue to cook slightly on the hot baking sheet. Over-baking by even 2 minutes can lead to dry, crumbly cookies.
- Incorrect Oven Temperature: An oven that’s too hot will burn the edges before the center cooks, while one that’s too cool will cause excessive spreading. Invest in an oven thermometer for accuracy; oven temperatures can vary by up to 50°F from their dial setting.
- Crowding the Baking Sheet: Give your cookies space to spread evenly. Overcrowding leads to uneven baking and cookies that stick together. Aim for 2 inches between each dough ball.
Storage Tips
Maximize the freshness and flavor of your delicious chocolate chip cookies with these smart storage solutions:
- Room Temperature (Short Term): Once completely cooled, store your chocolate chip cookies in an airtight container at room temperature for up to 3-4 days. For optimal freshness, place a slice of bread in the container; the cookies will absorb moisture from the bread, keeping them soft.
- Freezing Baked Cookies (Long Term): For longer storage, cool cookies completely, then place them in a single layer on a baking sheet and freeze for about an hour until solid. Transfer the frozen cookies to a freezer-safe airtight container or heavy-duty freezer bag. They’ll stay fresh for up to 3 months. Thaw at room temperature or gently reheat in a microwave for a few seconds.
- Freezing Dough Balls (Prep Ahead): This is a fantastic time-saver! Scoop dough into balls, place them on a parchment-lined baking sheet, and freeze until solid. Transfer the frozen dough balls to a freezer-safe bag. When ready to bake, place frozen dough balls on a baking sheet, add 2-4 minutes to the baking time, and enjoy fresh, warm chocolate chip cookies on demand. This can save up to 40 minutes of prep time on a busy day!
- Reviving Stale Cookies: If your cookies have lost their softness, place them in the microwave for 10-15 seconds, or warm them in a preheated oven at 300°F (150°C) for a few minutes. They’ll regain some of their original chewiness.
Conclusion
There you have it – the ultimate guide to baking chocolate chip cookies that are not just good, but truly unforgettable. From the precise measurements of quality ingredients to the critical step of chilling your dough, every detail contributes to that perfect balance of chewy edges, soft centers, and rich, melting chocolate. More than just a recipe, this is a journey into the science and passion of baking, promising to transform your cookie experiences forever.
Don’t just take my word for it! Grab your apron, preheat your oven, and embark on this delicious adventure. I guarantee your first bite will make you a believer. Once you’ve mastered these incredible chocolate chip cookies, I’d love to hear about it! Share your baking triumphs, tips, and personal twists in the comments below. And if you’re looking for more delectable dessert inspirations or weeknight meal ideas, don’t miss out on exploring other culinary delights right here on Malia Recipes. Your next favorite dish might just be a click away!
FAQ
Got questions about perfecting your chocolate chip cookies? I’ve got answers!
Q1: Can I use cold butter if I’m in a hurry?
A: While it’s tempting, using cold butter will significantly impact the cookie’s texture. Room temperature (softened but cool) butter is crucial for proper creaming with the sugars, which incorporates air and leads to a lighter, more tender cookie. Cold butter will result in a denser, less airy cookie. If you’re short on time, cut your butter into small pieces and let it sit for 15-20 minutes, or gently microwave for a few seconds (be careful not to melt it!).
Q2: Why did my cookies spread too much?
A: Excessive spreading is a common issue! Several factors could be at play:
* Warm Dough: Not chilling the dough is the biggest culprit. Chilled dough spreads less.
* Over-softened Butter: If your butter was too warm or melted, it will cause the cookies to spread.
* Too Little Flour: Inaccurate measuring (e.g., spooning flour directly from the bag without levelling) can lead to too little flour.
* Oven Temperature: An oven that’s too cool can cause cookies to spread before setting.
* Greasy Baking Sheet: If not using parchment paper or silicone mats, heavily greased baking sheets can contribute to spreading.
Q3: What’s the best type of chocolate to use?
A: The “best” is subjective, but for a truly exceptional experience, use high-quality chocolate. A mix of milk, semi-sweet (around 60% cacao), and dark chocolate (70%+) provides depth. Chopped chocolate bars (like Ghirardelli or Lindt) often create those beautiful, melty puddles you see in gourmet cookies. For optimal flavor contrast and visual appeal, consider a blend!
Q4: Can I make the dough in advance?
A: Absolutely, and in fact, it’s encouraged! The dough can be stored in an airtight container in the refrigerator for up to 3 days, and some bakers even swear by chilling it for up to 72 hours for an even deeper, more complex flavor. This makes these chocolate chip cookies perfect for meal (or dessert!) prepping.
Q5: My cookies are hard and crunchy. What went wrong?
A: This usually points to over-baking. Remember the rule: edges set, centers still look soft. Cookies continue to bake on the hot baking sheet even after they are removed from the oven. Next time, try reducing your baking time by 1-2 minutes. Also, ensure your granulated sugar wasn’t over-measured, as too much can lead to a crunchier cookie.
Q6: Can I freeze the baked cookies?
A: Yes! Once completely cooled, place the cookies in a single layer on a baking sheet and freeze until solid. Then transfer them to a freezer-safe container or bag. They will keep well for up to 3 months. Thaw at room temperature for about 30 minutes, or warm gently in the microwave or oven for that fresh-baked feel.
Discover More Deliciousness!
If you loved perfecting these chocolate chip cookies, you’ll surely enjoy exploring some of our other fantastic recipes and culinary tips:
- For another delightful sweet treat, check out our Irresistible Healthy Fall Desserts: 25 Easy Recipes for Autumn Treats for seasonal inspirations.
- Looking for more inspiration in the kitchen? Our guide to Easy and Tasty Simple Sandwiches Recipes offers quick and delightful meal ideas.
- If you’re eager to try another baking project, our Perfect Zucchini Pizza Crust Recipe Delight is a surprising and delicious take on a favorite.
- For those who appreciate the art of homemade goodies, our advice on Canning Pears Guide: Easy Recipes and Tips can broaden your culinary horizons.
- And for a touch of whimsy, explore Whimsical Kids Party Cake Recipe: Fun and Easy Baking Ideas to bring joy to any celebration!
